Introduction to Microservice End-to-End tests with Cucumber
An introduction to the benefits of using BDD, Cucumber and its Gherkin syntax for End-to-End tests in a microservice architecture, using Java code examples.

Create an example Cucumber project in Java with the right package structure, and add an HTTP Client to connect to the backend system.
Complete 4-part guide series
An introduction to the benefits of using BDD, Cucumber and its Gherkin syntax for End-to-End tests in a microservice architecture, using Java code examples.
Create an example Cucumber project in Java with the right package structure, and add an HTTP Client to connect to the backend system.
We use a real project as a practical example of how to implement step definitions with Cucumber in Java, and the best practices to keep state between steps.
Write stable end-to-end Cucumber tests with Awaitility to deal with asynchronous and eventually-consistent systems.
The second part of this Guide introduces the real-life example project of Cucumber tests for end-to-end functional scripts. You’ll create the skeleton project, design the structure of packages and classes, and implement the HttpClient to trigger API calls to the backend system. Besides, we’ll add already two complete Cucumber’s Feature files using the most important Gherkin syntax’s functionalities.
To put Cucumber into practice, we’ll use the same system we built in the book. This project has all the challenges you would face in a real implementation of end-to-end microservice tests with Cucumber, like Eventual Consistency (which we’ll cover in detail in Part 4).
Let’s describe from a high-level perspective what the system does, in case you didn’t read the book (it’s never too late!).
The Multiplication Challenge application invites users to solve mid-complex multiplications using mental calculation only. It’s a web page where they enter their alias and the attempt to solve the challenge. All the attempts for a given user (identified by their alias) are stored and later displayed as statistics. This application also integrates Gamification features. In case the attempt is correct, the user gets their score increased and may also win badges. See Figure 1.
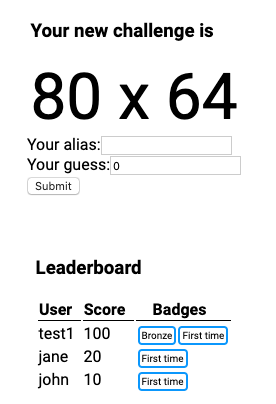
On the technical side, the backend functionality is implemented in two microservices: multiplication and gamification. Since this project guides the reader through a realistic example of a microservice architecture, it includes other common patterns like a Gateway service (with Spring Cloud Gateway) and a Service Discovery registry (Consul). The frontend is a very simple React application. See Figure 2. If you are interested in the technical details, check the README file in the book’s Github repository (all the book’s code sources are available online).

From the end-to-end testing perspective, we’ll interact with the public REST API -the exposed endpoints by the Gateway- to simulate the user’s behavior. We won’t cover the frontend in our tests; this is a common approach in many organizations because it’s a good balance between good end-to-end coverage and simplicity.
GitHub Repository: All the code in this post is available on GitHub: Book - Cucumber Tests. If you find it useful, please give it a star!
Let’s start coding. To create an empty project in Cucumber we can use the Maven archetype (make sure you have installed Maven first). See the complete command below. You can use the last archetype version, which you’ll find in the Cucumber’s 10-minute tutorial.
$ mvn archetype:generate                        \
   "-DarchetypeGroupId=io.cucumber"           \
   "-DarchetypeArtifactId=cucumber-archetype" \
   "-DarchetypeVersion=6.6.0"                 \
   "-DgroupId=microservices.book"             \
   "-DartifactId=cucumber-tests"              \
   "-Dpackage=microservices.book"             \
   "-Dversion=1.0.0-SNAPSHOT"                 \
   "-DinteractiveMode=false"
That command will create a new folder called cucumber-tests.
The archetype generates a basic pom.xml that defines dependencies with the latest versions of the cucumber-java and cucumber-junit artifacts, and it adds JUnit too. Besides, it creates a class for us to run the Cucumber features with JUnit: RunCucumberTests. See the example below. We described the annotations in this class already in the first part of this guide when we covered the Cucumber-JUnit integration.
package microservices.book;

import io.cucumber.junit.Cucumber;
import io.cucumber.junit.CucumberOptions;
import org.junit.runner.RunWith;

@RunWith(Cucumber.class)
@CucumberOptions(plugin = {"pretty"})
public class RunCucumberTest {
}
The archetype generates a StepDefinitions class as well. See the code below. It even includes some useful import clauses, so we can start adding the annotated methods that map to our Gherkin (.feature) files.
package microservices.book;

import io.cucumber.java.en.Given;
import io.cucumber.java.en.Then;
import io.cucumber.java.en.When;

import static org.junit.Assert.*;

public class StepDefinitions {
}In this Cucumber example project, we’ll use some additional libraries:
The final version of the pom.xml file with all these dependencies and a more recent Java version is the one shown below.
<?xml version="1.0" encoding="UTF-8"?>
<project xmlns:xsi="http://www.w3.org/2001/XMLSchema-instance"
         xmlns="http://maven.apache.org/POM/4.0.0"
         xsi:schemaLocation="http://maven.apache.org/POM/4.0.0 http://maven.apache.org/xsd/maven-4.0.0.xsd">
    <modelVersion>4.0.0</modelVersion>

    <groupId>microservices.book</groupId>
    <artifactId>cucumber-tests</artifactId>
    <version>1.0.0-SNAPSHOT</version>
    <packaging>jar</packaging>

    <properties>
        <java.version>14</java.version>
        <cucumber.version>6.6.0</cucumber.version>
        <junit.version>4.13</junit.version>
        <assertj.version>3.17.2</assertj.version>
        <jackson.version>2.11.2</jackson.version>
        <project.build.sourceEncoding>UTF-8</project.build.sourceEncoding>
    </properties>

    <dependencies>
        <dependency>
            <groupId>io.cucumber</groupId>
            <artifactId>cucumber-java</artifactId>
            <version>${cucumber.version}</version>
            <scope>test</scope>
        </dependency>

        <dependency>
            <groupId>io.cucumber</groupId>
            <artifactId>cucumber-junit</artifactId>
            <version>${cucumber.version}</version>
            <scope>test</scope>
        </dependency>

        <dependency>
            <groupId>junit</groupId>
            <artifactId>junit</artifactId>
            <version>${junit.version}</version>
            <scope>test</scope>
        </dependency>

        <dependency>
            <groupId>org.assertj</groupId>
            <artifactId>assertj-core</artifactId>
            <version>${assertj.version}</version>
            <scope>test</scope>
        </dependency>

        <dependency>
            <groupId>com.fasterxml.jackson.core</groupId>
            <artifactId>jackson-core</artifactId>
            <version>${jackson.version}</version>
            <scope>test</scope>
        </dependency>

        <dependency>
            <groupId>com.fasterxml.jackson.core</groupId>
            <artifactId>jackson-databind</artifactId>
            <version>${jackson.version}</version>
            <scope>test</scope>
        </dependency>

        <dependency>
            <groupId>org.awaitility</groupId>
            <artifactId>awaitility</artifactId>
            <version>4.0.3</version>
            <scope>test</scope>
        </dependency>

    </dependencies>

    <build>
        <plugins>
            <plugin>
                <groupId>org.apache.maven.plugins</groupId>
                <artifactId>maven-compiler-plugin</artifactId>
                <version>3.8.1</version>
                <configuration>
                    <encoding>UTF-8</encoding>
                    <source>${java.version}</source>
                    <target>${java.version}</target>
                </configuration>
            </plugin>
        </plugins>
    </build>
</project>As described in detail in the book (and summarized at the beginning of this post), the main functionality of our application is to allow users to solve challenges to improve their brain skills. As an engagement addition, our application gives points and badges. Actually, I don’t need to get into details about how the system’s features work because the test scripts are self-explanatory. They are an example of how we can leverage Cucumber and Gherkin to show people how a system works.
The first Feature file we’ll add was partially included in Part 1 as a Gherkin example: the “Solving Challenges” feature. See the code below. We can create this file under the src/test/resources folder, which Cucumber will scan. In our case, we’ll keep a structure similar to the source code, so we’ll place it in the subfolder microservices/book.
Feature: Solve multiplication challenges
  We present users with challenges they should solve using mental calculation
  only. When they're right, we give them score and, in some cases, new badges.
  All attempts from all users are stored, so they can see their historical data.

  Scenario: Users get new attempts.
    Given a new user Mary
    When she requests a new challenge
    Then she gets a mid-complexity multiplication to solve

  Scenario: Users solve challenges, they get feedback and their stats.
    Given a new user John
    And he requests a new challenge
    When he sends the correct challenge solution
    Then his stats include 1 correct attempt

  Scenario: Users get feedback also about incorrect attempts.
    Given a new user Horatio
    When he requests a new challenge
    * he sends the incorrect challenge solution
    * he sends the correct challenge solution
    Then his stats include 1 correct attempt
    * his stats include 1 incorrect attempts
Let’s focus on the first scenario: “Users get new attempts”. We want to check if the system retrieves a multiplication challenge for a new User. Following a “Given-When-Then” syntax, we define these steps:
In Cucumber, we can reuse Step Definitions across scenarios and features. In this Gherkin file, we’re doing that with the first two steps. To make that work, we’ll make the name of the user a parameter to be passed to the Java method. Besides, we’ll define an alternative text in many of these steps, he/she, to make Cucumber a bit more inclusive while we also support a natural language.
The second and third scenarios introduce two new step patterns:
As explained in the first part of the guide, the feature definitions usually go over a continuous rephrasing process:
For example, in my case, I wrote originally the first scenario as:
  Scenario: Users get new attempts.
    When a user accesses the application
    Then they get a mid-complexity multiplication to solve
Then, while mapping the other two scenarios to Java code, I noticed that I could reuse the same steps to define a user and retrieve a new challenge while keeping this scenario readable. This rephrasing process in general allowed me to define these three test scenarios with only five different Gherkin sentences.
From a user’s perspective, the second feature of our system is the leaderboard. It shows a ranking of all users with their corresponding scores. The code below describes this feature with a single scenario.
Feature: The Leaderboard shows a ranking with all the users who solved
  challenges correctly. It displays them ordered by the highest score first.

  Scenario: Users get points and badges when solving challenges, and they
  are positioned accordingly in the Leaderboard.
    Given the following solved challenges
      | user  | solved_challenges |
      | Karen | 5                 |
      | Laura | 7                 |
    Then Karen has 50 points
    * Karen has the "First time" badge
    And Laura has 70 points
    * Laura has the "First time" badge
    * Laura has the "Bronze" badge
    And Laura is above Karen in the ranking
Again, we can find some sentences in this file that went through a rephrasing process to be able to map them to a single step definition in code. For example, (name) has N points and (name) has the (badge) badge. To demonstrate the usage of additional features, we also added here a Gherkin’s Data Table. These structures are useful to pass lists of values to our scripts while we keep them readable. We’ll see how to process this table in Part 3 of this guide.
Next, we could implement these step definitions with the corresponding expressions in code. But, before that, let’s analyze how to structure our project and the components we need, so we can avoid duplications and create a project that can be later extended with more features easily.
GitHub Repository: All the code in this post is available on GitHub: Book - Cucumber Tests. If you find it useful, please give it a star!
In Part 1, we learned that a Cucumber project needs some basic elements:
.feature files.@RunWith annotation. In our project, this was created automatically by the archetype: RunCucumberTest.java.StepDefinitions.java.That’s the main structure, but we’ll need more classes. To begin with, putting all the logic into the same step definition class is not a good idea — it’ll become a mess. Therefore, we need to think about how to split the logic we’ll use to run the steps.
We’ll separate the components of the project following these guidelines:
You should avoid having a Step Definition class per Cucumber feature because that makes it harder to reuse steps across different features and scenarios (see Anti-patterns). In our approach, we could reuse the
Challengeclass across features that need to simulate the user’s behavior. We’ll see this more in detail in Part 3.
Figure 3 shows the high-level view of our components.

In this guide, we’ll implement all those components. When we finish the development, our project structure will look like the shown below (remember, you can also download the complete project from Github).
cucumber-tests
|-- README.md
|-- mvnw
|-- mvnw.cmd
|-- pom.xml
`-- src
    `-- test
        |-- java
        |   `-- microservices
        |       `-- book
        |           |-- RunCucumberTest.java
        |           `-- cucumber
        |               |-- actors
        |               |   |-- Challenge.java
        |               |   `-- Leaderboard.java
        |               |-- api
        |               |   |-- APIClient.java
        |               |   `-- dtos
        |               |       |-- challenge
        |               |       |   |-- AttemptRequestDTO.java
        |               |       |   |-- AttemptResponseDTO.java
        |               |       |   `-- ChallengeDTO.java
        |               |       |-- leaderboard
        |               |       |   `-- LeaderboardRowDTO.java
        |               |       `-- users
        |               |           `-- UserDTO.java
        |               `-- steps
        |                   |-- ChallengeStepDefinitions.java
        |                   `-- GameStepDefinitions.java
        `-- resources
            |-- cucumber.properties
            `-- microservices
                `-- book
                    |-- leaderboard.feature
`-- solving_challenges.featureTo communicate with our backend from the tests, we need to interact with the REST API exposed via the Gateway, located at localhost:8000 when we run the system locally. We’ll connect to both the Challenges API and the Gamification API from our new APIClient class.
We could include as a dependency one of the multiple libraries that implement an HTTP Client in Java, but we don’t really need it because we can stick to the built-in Java’s HttpClient class, available in the JDK since version 11.
Since we need to parse and generate JSON, we’ll create a Jackson’s ObjectMapper. We’ll configure it to ignore unknown properties returned from the server. This way, we can model our DTOs (Data Transfer Objects) with only the fields we need for the tests, and we keep our code working even if the backend adds new attributes to the API. The Java representations of the API that we need to create are:
ChallengeDTO (see code), which includes the challenge object’s response from the server.AttemptRequestDTO (see code) contains the guess from the user.UserDTO (see code) holds the basic information of the user: alias and server’s identifier.AttemptResponseDTO (see code) models the response from the Challenges API, with the result and the user identifier.LeaderboardRowDTO (see code) represents a row in the leaderboard. The complete ranking returned by the server can be mapped to a list of these objects.All these DTOs are plain Java objects with a basic constructor and getters, so I’m not including their code here for conciseness. Check the links in the list if you’re curious.
The APIClient class’ core logic uses the HttpClient and ObjectMapper classes to perform HTTP requests to the backend’s REST API, mapping JSON from/to Java classes where needed. See the code below. For now, the implementation of the Body Handlers has been omitted. We’ll get to that later.
public class APIClient {

    private static final ObjectMapper OBJECT_MAPPER = new ObjectMapper()
            .configure(DeserializationFeature.FAIL_ON_UNKNOWN_PROPERTIES, false);
    private static final String BACKEND_HOST = "http://localhost:8000";

    private final HttpClient httpClient;

    public APIClient() {
        this.httpClient = HttpClient.newHttpClient();
    }

    public HttpResponse<ChallengeDTO> getChallenge() throws Exception {
        var getRandom = HttpRequest.newBuilder(
                URI.create(BACKEND_HOST + "/challenges/random")
        ).GET().build();
        return httpClient.send(getRandom, new JsonBodyHandler<>(ChallengeDTO.class));
    }

    public HttpResponse<AttemptResponseDTO> sendAttempt(AttemptRequestDTO attempt) throws Exception {
        var sendChallenge = HttpRequest.newBuilder(
                URI.create(BACKEND_HOST + "/attempts"))
                .header("Content-Type", "application/json")
                .POST(ofString(OBJECT_MAPPER.writeValueAsString(attempt))).build();
        return httpClient.send(sendChallenge, new JsonBodyHandler<>(AttemptResponseDTO.class));
    }

    public HttpResponse<List<AttemptResponseDTO>> getStats(String user) throws Exception {
        var getStats = HttpRequest.newBuilder(
                URI.create(BACKEND_HOST + "/attempts?alias=" + user)
        ).GET().build();
        return httpClient.send(getStats, new JsonListBodyHandler<>(AttemptResponseDTO.class));
    }

    public HttpResponse<List<LeaderboardRowDTO>> getLeaderboard() throws Exception {
        var getStats = HttpRequest.newBuilder(
                URI.create(BACKEND_HOST + "/leaders")
        ).GET().build();
        return httpClient.send(getStats, new JsonListBodyHandler<>(LeaderboardRowDTO.class));
    }

    static class JsonBodyHandler<T> implements HttpResponse.BodyHandler<T> { ... }

    static class JsonListBodyHandler<T> implements HttpResponse.BodyHandler<List<T>> { ... }

}
As you see, the fluent style of the HttpClient class is straightforward to use. We create requests with:
var request = HttpRequest.newBuilder([target uri]).HTTP_METHOD([optional request body content]).build();Then, to send the requests to the server, we call:
var response = httpClient.send(request, [response body handler]);The main responsibility of the body handler is to read and transform the HTTP response’s payload to the class we specify. The BodyHandlers class (since JDK 11) includes some built-in body handlers, for example, to convert the response body to a String object (BodyHandlers.ofString()). Unfortunately, there are no built-in JSON converters, but they’re not hard to implement using Jackson’s ObjectMapper.
We’ll build two versions of a JSON Body Handler: one deserializes single objects and another one handles lists. See the code below for the implementation of the single object deserialization.
static class JsonBodyHandler<T> implements HttpResponse.BodyHandler<T> {

    private final Class<T> clazz;

    public JsonBodyHandler(Class<T> clazz) {
        this.clazz = clazz;
    }

    @Override
    public HttpResponse.BodySubscriber<T> apply(HttpResponse.ResponseInfo responseInfo) {
        var stringBodySubscriber = HttpResponse.BodySubscribers
                .ofString(StandardCharsets.UTF_8);

        return HttpResponse.BodySubscribers.mapping(
                stringBodySubscriber,
                (body) -> {
                    try {
                        return OBJECT_MAPPER.readValue(body, this.clazz);
                    } catch (JsonProcessingException e) {
                        throw new UncheckedIOException(e);
                    }
                });
    }
}
We use a JDK 11’s BodySubscriber to create a subscriber that receives a String. When we receive the data, we call the ObjectMapper to deserialize it to the class that we passed to this body handler. With Java generics, we make sure that this class is reusable for all the DTO types.
The other body handler is very similar. The main difference is that we return a list of objects, which requires using a different approach with ObjectMapper and a CollectionType. Read the post “Java and JSON serialization with ObjectMapper” to learn more about deserializing lists and other collections with Jackson. See the code below.
static class JsonListBodyHandler<T> implements HttpResponse.BodyHandler<List<T>> {

    private final CollectionType mapCollectionType;

    public JsonListBodyHandler(Class<T> clazz) {
        this.mapCollectionType = OBJECT_MAPPER.getTypeFactory()
                .constructCollectionType(List.class, clazz);
    }

    @Override
    public HttpResponse.BodySubscriber<List<T>> apply(HttpResponse.ResponseInfo responseInfo) {
        var stringBodySubscriber = HttpResponse.BodySubscribers
                .ofString(StandardCharsets.UTF_8);

        return HttpResponse.BodySubscribers.mapping(
                stringBodySubscriber,
                (body) -> {
                    try {
                        return OBJECT_MAPPER.readValue(body, this.mapCollectionType);
                    } catch (JsonProcessingException e) {
                        throw new UncheckedIOException(e);
                    }
                });
    }
}
GitHub Repository: All the code in this post is available on GitHub: Book - Cucumber Tests. If you find it useful, please give it a star!
After we finished the ApiClient class, we have a complete client for our application server that we can use in tests. For example, if we want to retrieve a Challenge from the server and send the correct attempt to solve it, we could write the code below.
ApiClient apiClient = new ApiClient();
ChallengeDTO challenge = apiClient.getChallenge().getBody();
AttemptRequestDTO attemptRequest = new AttemptRequestDTO(
    challenge.getFactorA(),
    challenge.getFactorB(),
    "user-alias",
    challenge.getFactorA() * challenge.getFactorB()
);
AttemptResponseDTO attemptResponse = apiClient.sendAttempt(attemptRequest);
System.out.println("Is the challenge correct according to the server? " +
    attemptResponse.body().isCorrect()
);
We’ll use the ApiClient in our step definition classes, but we won’t use it directly from there. Instead, we’ll encapsulate it within classes that also include the state of the different interactions that are available in the system: the Challenge, and the Leaderboard. We’ll learn how to accomplish this in the next part of this guide.
Complete 4-part guide series
An introduction to the benefits of using BDD, Cucumber and its Gherkin syntax for End-to-End tests in a microservice architecture, using Java code examples.
Create an example Cucumber project in Java with the right package structure, and add an HTTP Client to connect to the backend system.
We use a real project as a practical example of how to implement step definitions with Cucumber in Java, and the best practices to keep state between steps.
Write stable end-to-end Cucumber tests with Awaitility to deal with asynchronous and eventually-consistent systems.
Join hundreds of software architects and engineers getting practical insights delivered to their inbox.