
Full Reactive Stack – The Angular frontend
Building a reactive Angular frontend for our Spring WebFlux application
This post is a blog version of one part of the Full Reactive Stack with Spring Boot, WebFlux, Angular, RxJS, and Eventsource Guide. The complete code sources are on GitHub.
This guide has four main chapters and an appendix:
-
The Reactive Web. This chapter guides you through the main concepts of a reactive approach and compares it to the classic web interfaces.
-
The backend. This section covers the creation of the Spring Boot application using the required dependencies and the development of the backend layers, paying special attention to the Controllers with WebFlux and the MongoDB reactive driver.
-
The frontend. It goes through the development of an Angular application that consumes the reactive endpoint created on the server’s side.
-
Conclusions. This part completes the guide, summarizing what you’ve built and comparing the Reactive and Classic Web approaches. It gives some insights on performance, testability, etc.
-
Run the app with Docker. This appendix helps you build and run the full-stack application in Docker.
All the source code (spring-boot, Angular, Docker) is available on GitHub: Full-Reactive Stack repository. If you find it useful, please give it a star!
In the previous chapter, we created a Spring Boot application with a Reactive Web API. In this chapter, we’ll cover how to implement the client’s side using Angular with EventSource and RxJS’ Observable.
Goal
This chapter focuses on the client’s side of the system. We have already created a Reactive Web Endpoint that can supply server-sent events, but how can we use it more realistically? That will be our Angular application.
As a disclaimer, I’m far from an expert in Angular and Typescript, so the application has room for improvement. I’ll skip the Angular basics and immediately jump into the Reactive Service. If you want to learn Angular, this guide is not the best choice; better check the official docs, for example.
Why Angular?
I chose Angular to implement the frontend side because I have some experience with this framework, and it’s very backend-friendly. However, you could use the instructions in this guide to implement the solution in any other framework. That’s because the reactive functionality is supported by RxJS and the EventSource specification, which is part of HTML5.
Creating the Angular application
The best option for getting the Angular project skeleton is to use the Angular CLI tool, as described in the Setup guide on Angular’s website.
You’ll also need Node.js (including npm) installed on your system.
Remember that the complete source code (Spring Boot, Angular, Docker) is available on GitHub: Full-Reactive Stack repository. If you find it useful, please star it!
UI Application Overview
We’ll build a simple application that allows us to load the available quotes from the server in a reactive manner (using Server-Sent Events) or in a classic blocking style. That option will come from our Angular Service, so we’ll implement two to showcase the differences. The UI contains a table, and the goal is that the table rows will be updated as soon as we receive book quotes.
To make it more interesting, if we click on a quote, the entire content will be displayed in a different component on the screen. So, it’s a master-detail view where the master rows are loaded dynamically using Reactive patterns.
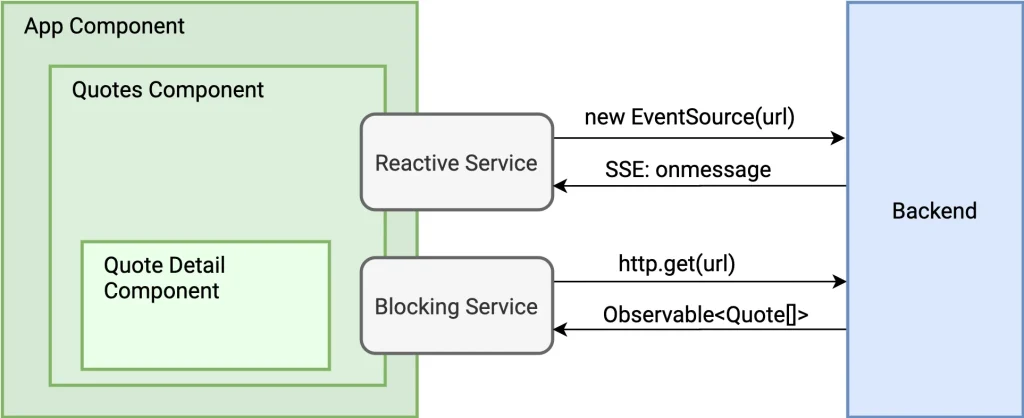
As shown in the figure above, our application has three simple Angular components and two services. The component at the top of the hierarchy is the App Component, which acts just as a wrapper for the Quotes Component in our scenario.
The Quotes Component is the core component of our application. It uses the Quote Reactive Service and the Quote Blocking Service through Dependency Injection. The Quote Detail Component will also be included in the main component. It just shows the full contents of the selected Quote object.
The rest of the files in the GitHub repository are tests, styles, dependency management, module definitions, etc. As mentioned before, if you’re unfamiliar with Angular and want to learn more, I recommend you follow the introductory Tour of Heroes tutorial, in which you’ll grasp all these concepts.
This chapter will focus on how the Quote Reactive Service works and its connection with the Component.
The Angular Reactive service
Let’s look at the reactive service code that interacts with the backend using Server-Sent Events. We’ll cover it in detail later.
import { Injectable } from '@angular/core';

import { Quote } from './quote';

import {Observable} from 'rxjs';

@Injectable()
export class QuoteReactiveService {

  url: string = 'http://localhost:8080/quotes-reactive';
  urlPaged: string = 'http://localhost:8080/quotes-reactive-paged';

  getQuoteStream(page?: number, size?: number): Observable<Quote> {
    return new Observable<Quote>((observer) => {
      let url = this.url;
      if (page != null) {
        url = this.urlPaged + '?page=' + page + '&size=' + size;
      }
      let eventSource = new EventSource(url);
      eventSource.onmessage = (event) => {
        console.debug('Received event: ', event);
        let json = JSON.parse(event.data);
        observer.next(new Quote(json['id'], json['book'], json['content']));
      };
      eventSource.onerror = (error) => {
        // readyState === 0 (closed) means the remote source closed the connection,
        // so we can safely treat it as a normal situation. Another way
        // of detecting the end of the stream is to insert a special element
        // in the stream of events, which the client can identify as the last one.
        if(eventSource.readyState === 0) {
          console.log('The stream has been closed by the server.');
          eventSource.close();
          observer.complete();
        } else {
          observer.error('EventSource error: ' + error);
        }
      }
    });
  }

}Now, some explanation about the most important ideas in that code:
With EventSource, we connect to the endpoint, setting a Content-Type text/event-stream. This is implicitly set up by the API. As we saw in the previous section, we open a channel in which the server will send us events. We implicitly create this connection when constructing the object, passing the endpoint where
Whenever we receive an event through the EventSource object (onmessage), we emit a new Quote object using Observable.next. Note that we don’t use EventSource (SSE) to pass data within our UI application. Instead, we use here a ReactiveX (RxJS) Observable object. A Subscriber of that Observable will receive events when the array gets updated – an action that we perform by calling next().
As detailed in the code comments, we’ll get an error when the remote closes the stream. We can identify that error if readyState is zero, and then we treat it as a normal situation: we complete the observer so the subscribers know that they consumed all the available data.
The Angular Components – Quick Overview
The Quotes Component (quotes.component.ts) is the part interacting with the Services, both the blocking and the reactive ones.
This component uses the Reactive or the Blocking service depending on the user’s choice (via buttons on the HTML page, as we’ll see in the following sub-section). It subscribes to the Observable object and pushes a new element in the data array every time a new item arrives. That’s the most crucial part of the component logic. To make sure that the UI refreshes after each update, we use Angular’s
ChangeDetectorRef via injection to force change detection.
As you can see, no matter which service we’re calling, the result will be an Observable. The reason is that the blocking HTTP API we use also returns an Observable object. The only difference is that the blocking service returns a full array of Quotes all at once.
import {Quote} from './quote';
import {QuoteReactiveService} from './quote-reactive.service';
import {QuoteBlockingService} from './quote-blocking.service';

import {Observable} from 'rxjs';
import {ChangeDetectorRef, Component} from "@angular/core";

@Component({
  selector: 'app-component-quotes',
  providers: [QuoteReactiveService],
  templateUrl: './quotes.component.html'
})
export class QuotesComponent {

  quoteArray: Quote[] = [];
  selectedQuote: Quote;
  mode: string;
  pagination: boolean;
  page: number;
  size: number;

  constructor(private quoteReactiveService: QuoteReactiveService, private quoteBlockingService: QuoteBlockingService, private cdr: ChangeDetectorRef) {
    this.mode = "reactive";
    this.pagination = true;
    this.page = 0;
    this.size = 50;
  }

  resetData() {
    this.quoteArray = [];
  }

  requestQuoteStream(): void {
    this.resetData();
    let quoteObservable: Observable<Quote>;
    if (this.pagination === true) {
      quoteObservable = this.quoteReactiveService.getQuoteStream(this.page, this.size);
    } else {
      quoteObservable = this.quoteReactiveService.getQuoteStream();
    }
    quoteObservable.subscribe(quote => {
      this.quoteArray.push(quote);
      this.cdr.detectChanges();
    });
  }

  requestQuoteBlocking(): void {
    this.resetData();
    if (this.pagination === true) {
      this.quoteBlockingService.getQuotes(this.page, this.size)
        .subscribe(q => this.quoteArray = q);
    } else {
      this.quoteBlockingService.getQuotes()
        .subscribe(q => this.quoteArray = q);
    }
  }

  onSelect(quote: Quote): void {
    this.selectedQuote = quote;
  }
}
To complete the stack service-component-template, we must provide HTML code that renders this component. This implementation is very simple since it uses Angular basics with a for over an array. See the code below.
<div class="row">
  <div class="col-md-8">
    <p>
      <label>Pagination:
        <input type="checkbox" [checked]="pagination" (change)="pagination = !pagination" >
        <label>Page #:
          <input type="text" [(ngModel)]="page" size="2">
        </label>
        <label>Page Size:
          <input type="text" [(ngModel)]="size" size="2">
        </label>
      </label>
      <button (click)="requestQuoteStream()">Reactive Request</button>
      <button (click)="requestQuoteBlocking()">Blocking Request</button>
    </p>
    <table class="table">
      <thead>
      <tr>
        <th>Quote ID</th>
        <th>Book</th>
        <th>Quote content</th>
      </tr>
      </thead>
      <tbody>
      <tr *ngFor="let quote of quoteArray" [class.success]="quote === selectedQuote" (click)="onSelect(quote)">
        <td>{{quote.id}}</td>
        <td>{{quote.book}}</td>
        <td>{{quote.content.substr(0, 30)}}...</td>
      <tr>
      </tbody>
    </table>
  </div>
  <div class="col-md-4">
    <div class="message">Click on a quote for more details</div>
    <app-quote-detail [quote]="selectedQuote"></app-quote-detail>
  </div>
</div>
Unlock the Full Reactive Guide: Get This Blog Series and More as a Comprehensive eBook—Available Now for Purchase! Download all posts (plus bonus) as a mini-book
Running the frontend
First, ensure the backend side is up and running, MongoDB included. If you cloned the git repository, you must download the node dependencies. From the angular-reactive folder, you have to execute:
$ npm installThen, we can run the frontend application from the command line with:
$ npm run ng serveIf everything goes well, we’ll see the following screen when we navigate with our browser to http://localhost:4200.
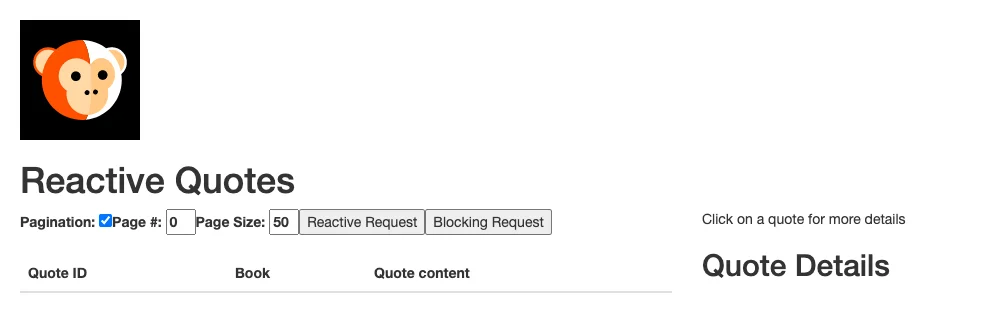
We have two buttons to choose between a Reactive or a Blocking request. That’s the switch between calling one service or the other. We can also decide whether we want pagination and its corresponding configuration.
Remember that, depending on your device, you may experience memory problems when requesting all the data simultaneously (no pagination). In that case, you can change the backend code (controller) to limit the number of quotes returned. Check the backend chapter for more details.
We can now play with all these options and see how the quotes load either at once or one by one, depending on whether we execute a blocking request or a reactive one.
You should be able to feel how the user experience improves with the reactive approach. The quotes will show up as soon as the data is available so that we can access them almost immediately. We don’t need to wait for the server to return all elements (or a complete page). In the next chapter, we’ll detail performance and additional conclusions.

Angular Reactive App – Quotes
Navigate now to the Conclusions article, or Unlock the Full Reactive Guide: Get This Blog Series and More as a Comprehensive eBook—Available Now for Purchase!
Continue Reading This Series
This article is part of the Full Reactive Stack series:
- Part 1: Introduction
- Part 2: The Backend - Spring Boot, WebFlux and MongoDB
- Part 3: The Angular Frontend (this post)
- Part 4: Conclusions
Want the complete guide? Get This Blog Series and More as a Comprehensive eBook—Available Now for Purchase!
Get More Architecture Insights
Join hundreds of software architects and engineers getting practical insights delivered to their inbox.